Hey there, fellow construction pros, utility techs, and anyone who’s ever stared at a pile of MPP pipes and wondered, “Now what?” I’m Jake, and for the past eight years, I’ve been on the ground with my team—installing MPP pipes for everything from municipal power distribution runs to commercial building underground utilities, and answering every single question our clients throw at us about the process. As a supplier, we don’t just drop off materials and bounce; we stick around because bad installations are bad for everyone—you, your project timeline, and our reputation. So today, I’m walking you through the actual, step-by-step install process we’ve refined over hundreds of projects, plus the tiny mistakes that sink even the most well-purchased MPP pipe. Let’s dive in. MPP Pipe

First, let’s get one thing straight: MPP Pipe (Multi-Modular Polypropylene Pipe) isn’t your average PVC or metal pipe. It’s tough—resistant to corrosion, extreme temperatures, and heavy soil loads—but that durability only kicks in if you install it right. I’ve seen brand-new, top-of-the-line MPP pipe get crushed in a trench because the team skipped simple prep steps, and I’ve seen misaligned joints cause leaks that delayed a whole neighborhood’s power infrastructure for weeks. This isn’t rocket science, but it’s specific. Let’s start with pre-installation prep, because this is where 60% of install issues start, not when you’re dropping the pipe in the trench.
Before you even pick up an MPP pipe, you need three non-negotiable checks. First, site assessment. Don’t just show up with pipes and a shovel. You need to map the trench route—mark out where existing utility lines (water, gas, fiber) are using your local 811 service (never skip that call; I’ve had a teammate nearly take out a gas line because he thought the old paperwork was up to date). Next, check the soil type. MPP handles soft soil fine, but if you’re dealing with rocky or compacted clay, you’re going to need a bedding layer. If the soil has sharp rocks, roots, or construction debris, that’s a problem—those can puncture or scratch the pipe, and even a tiny scratch becomes a stress point when heavy soil presses down. We always say: if you’d cut your hand on that rock, it’ll cut your MPP pipe.
Second pre-install step: inspecting the pipe itself. When our deliveries arrive, our team checks every pipe for cracks, warps, or irregular seams—you should do the same when our materials get to your site. Don’t just sign for it and ignore it. I once had a client who didn’t inspect, and halfway through a project, we found a faulty joint; we had to delay the job, and we swapped it out without hassle, but that delay could’ve been avoided. Also, confirm the pipe size and class matches your project specs. MPP comes in different pressure ratings and wall thicknesses—for a 10-foot deep residential run, a Class 8 MPP is fine; for a 20-foot deep industrial line, you need Class 12. Using the wrong class is a fast track to failure.
Third, gather the right tools. You don’t need a fancy tool kit, but you do need the basics: a trench box (safety first—never work in an unshored trench over 4 feet deep), a compactor (for backfill), a pipe cutter (or a saw with a fine-tooth blade—no hacksaws that leave ragged edges), a level, and our MPP-specific joint lubricant (regular soap works for temporary fits, but our proprietary lubricant is non-toxic and designed to work with MPP’s molecular structure to create a watertight seal, so we always recommend it). Also, have a small hand truck or even straps to move the pipe—don’t drag it across dirt, that scratches it.
Okay, now we’re ready to get to the trench. Step one: dig the trench correctly. The trench width is important—you want enough room on both sides to work comfortably, but not so much that the pipe shifts. As a rule of thumb, the trench width should be at least 12 inches wider than the outer diameter of your MPP pipe. The depth? Follow local building codes, but add 6 inches of extra space at the bottom for bedding. Speaking of bedding, this is make-or-break. For most projects, a 4-inch layer of clean, granular bedding (sand, crushed stone, or silt-free gravel) is perfect. Rake it smooth and compact it lightly—no lumps, no rocks. If the soil is rocky, go a full 6 inches. If you skip bedding, the pipe will rest on hard spots, and when soil pressure builds, it’ll crack. I’ve seen this happen so many times; it’s preventable, so don’t rush.
Next, lower the pipe into the trench. This sounds simple, but don’t drop it—even from 2 feet up, a heavy piece of MPP (they’re not light, especially large sizes) can crack or warp. Use gentle lifting, either with a hoist or straps, and lower it straight down. Once it’s in the trench, check the alignment with a level. MPP joints have to be perfectly aligned—even a 1-degree angle can cause a leak or a weak joint. If it’s off, lift it gently, adjust the bedding, and set it back down. Don’t push it into place with force.
Now, the most critical step: joining the MPP pipe. This is where a lot of DIY or first-time installers mess up. There are two main joint types for MPP pipe: push-fit (most common for residential and low-pressure runs) and flanged (for high-pressure industrial lines). Let’s stick to push-fit, since that’s what 80% of our clients use. First, clean the ends of both pipes. If there’s dirt, sand, or even a fingerprint, wipe it off with a dry cloth—any debris will break the seal. Then, apply a thin, even layer of our MPP lubricant to the inside of the female fitting and the outside of the male pipe end. Don’t over-lubricate—too much makes the pipe slip out mid-join. Next, mark the insertion depth on the male pipe end with a marker—usually 2 to 4 inches, depending on the pipe size. This ensures you don’t push the pipe too far or not far enough. Now, align the two ends perfectly (no angles), and push firmly and evenly until you hear a distinct “click”—that’s the seal engaging. Once clicked, tug gently on both pipes to make sure they’re locked in. That’s it for push-fit joints. If you’re using flanged joints, you’ll need to use a torque wrench to tighten the bolts, but follow the manufacturer’s torque specs—over-tightening cracks the flange, under-tightening causes leaks.
Wait, a quick note on spacing: MPP pipe expands and contracts with temperature changes, just like any plastic. For runs longer than 50 feet, you need to leave a ¼-inch gap between joints so there’s room for thermal expansion. If you don’t do this, the pipe will buckle when it gets hot. I learned this the hard way early on—we installed a 70-foot line in the middle of summer, no gap, and by fall, it had a kink in it. We had to dig it all up, fix it, and add the gaps. Don’t be like us, check that expansion gap.
Now, backfilling. This is the final step, and it’s not just dumping dirt in. First, backfill 6 inches at a time, working from both sides of the pipe evenly—don’t dump a whole load on one side, that can shift the pipe and crack joints. The first layer of backfill (the 6 inches right on top of the pipe) has to be clean, no rocks, no roots, no debris. Once that first 6 inches is in, you can use the original soil, but keep it away from sharp materials. After each 6-inch layer, compact it lightly—again, don’t over-compact, that crushes the pipe. For the top foot of backfill, you can compact more heavily, since that’s above the pipe and the pressure is lower. Also, don’t drive heavy machinery over the backfill until it’s fully compacted and cured—wait at least 24 hours for the bedding and backfill to settle.
Now, let’s talk about post-install checks, because you’re not done once the dirt’s in. First, do a pressure test. For residential runs, a simple air test: fill the pipe with air to the recommended pressure (check the pipe’s class), hold it for 15 minutes, and if the pressure doesn’t drop more than 5%, it’s good. For larger industrial lines, a water test is better. Second, mark the route of the pipe above ground with stakes or spray paint—so anyone digging later doesn’t hit it. Third, inspect the joints a final time; if any look misaligned, gently adjust them before backfill fully sets.
Now, let’s get to the common mistakes we see all the time, because these are the ones that surprise people. Number one: skipping the local 811 call. I can’t emphasize this enough—hitting a utility line is dangerous, period. Number two: dragging MPP pipe across the ground. Even a small scratch here leads to a crack under pressure. Number three: using regular lubricant for joints. It might feel like it fits, but it breaks down over time, leading to leaks. Number four: no expansion gaps. As I learned, thermal expansion is real. Number five: over-compacting the backfill immediately. Rushing compaction crushes soft MPP pipe.
At the end of the day, installing MPP pipe isn’t about being a construction veteran—it’s about being meticulous, taking your time, and following the steps. We don’t just sell MPP pipe; we work with our clients every step of the way, from pre-purchase consultations to on-site guidance, because our clients’ success is our success. If you’re working on a project right now, whether it’s a small residential backup power line or a large commercial utility run, we have the right MPP pipe for your needs, and our team is here to answer any questions, no matter how small.
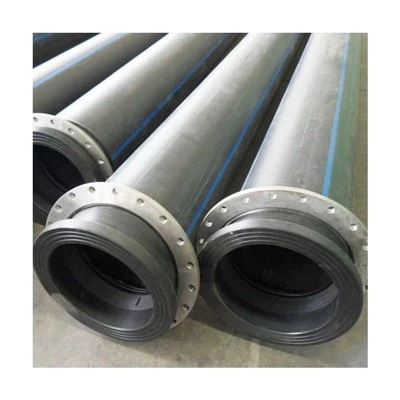
If you’re ready to get a quote, walk through a project plan, or just chat about the right MPP class for your site, feel free to reach out. We’re here to help you do the job right the first time, because that’s how we do business.
PP-R Pipes and Fittings References
- National Association of Construction Specifiers. (2021). MPP Pipe Installation Standards for Underground Utilities.
- American Society for Testing and Materials. (2022). Standard Practice for Thermoplastic Pipe Installation and Buried Applications.
- Municipal Utility Association of North America. (2023). Best Practices for Trench Safety and MPP Pipe Bedding Requirements.
Shanxi Kaisheng Plastic Co., Ltd.
As one of the most professional mpp pipe manufacturers and suppliers in China, we’re featured by quality products and good price. Please rest assured to buy customized mpp pipe made in China here from our factory. Welcome to contact us for quotation.
Address: No.72, Area S, Gate 1, Haohai Wumart, Fendong Street, Xiaodian District, Taiyuan City, Shanxi Province
E-mail: sxkssj8@163.com
WebSite: https://www.sx-kssj.com/
